
How to fix your soil:
A soil test is one of the most useful tools for understanding what your land needs. It helps identify soil pH and nutrient levels so you can make informed decisions about how to fix your soil by using lime, fertilizer, and other management practices. Collect representative samples from the areas you want to manage. If different parts of a field have noticeably different growth, soil types, or drainage, sample those areas separately when appropriate.
Use the recommendations from your soil testing laboratory to determine which amendments are needed and at what rates. If you don’t have those, then make sure you feed your plants everything they need. Studies also show that deer and cows prefer well-fertilized plots. Plants that lack minimum levels of needed elements will not grow properly or provide enough needed minerals to your animals. This deficiency can lead to stunting, yellowing or even plant death. Remember, when you feed your plants, the animals are also removing your fertilizer and absorbing the nutrients in their bones and tissues (leading to better animal growth). Fertility is important because plants with higher levels of nutrients perform better and can feed so many more animals, ensuring high rates of gain and a better investment of your seed dollars.
Tools Needed and When to Test Your Soil:
The best time to test soil for accurate results is during the fall, specifically between September and December. Here’s what you need:
-Soil probe, spade, or shovel
-Clean bucket for combining samples
-Soil sample box or bag from the testing laboratory
-Marker and field information
-Soil testing boxes can often be found for free at your county extension office:
–Find your local county extension office with this list of the agricultural extension offices across the US
Understanding Soil pH Level:
A soil pH test measures whether your soil is acidic, neutral, or alkaline. A pH of 7.0 is neutral, values below 7.0 indicate acidity, and values above 7.0 indicate alkalinity.
Many plants grow well in a pH range of 6.0 to 7.5, although the ideal range varies by species. Maintaining a suitable pH helps plants access essential nutrients and grow to their full potential.
Best Way to Test Your Soil:
Start by designating a field area. Within the field area, determine quadrants so that you can pull many representative samples from within that same field. Topsoil samples should include a core of the top six inches of soil. Try not to over-represent one layer of the soil. Avoid bare spots and water holes. The soil should not be sopping wet. If you pull a muddy sample, you might allow time for it to air dry before boxing it.
Use a spade or shovel to gather numerous samples from different sections of the field into a bucket. Remove debris, rocks and non-soil particles. Thoroughly mix the soil to get a homogenized composite sample. Most soil test boxes provided by county extension offices will allow for a pint of soil. Mark the box with your name and field information. Also, providing crop details to the extension office will allow for better soil recommendations. Sample costs are nominal through extension services. These test results are far better than in-home kits.
Problematic areas such as mud holes and bare spots could be sampled separately so that you can identify the exact nature of the problem.
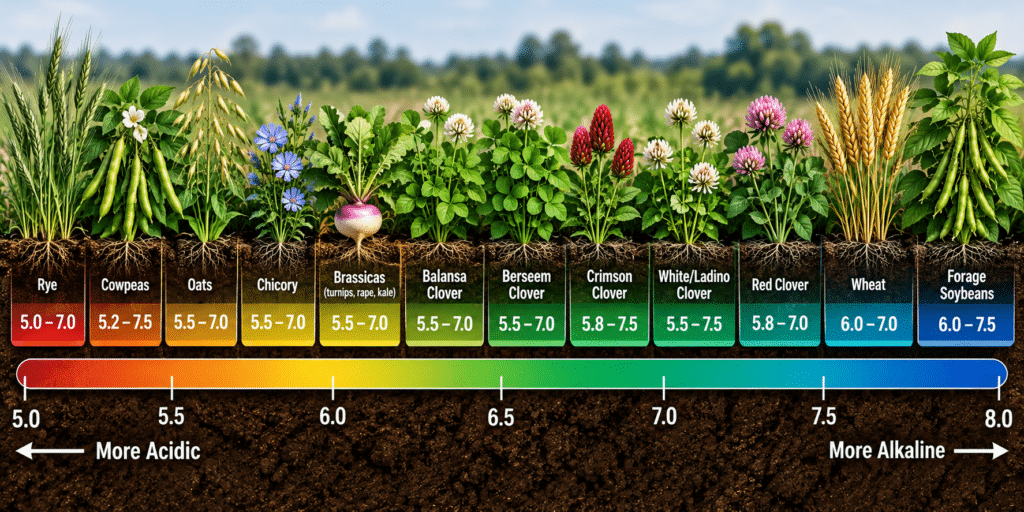
Utah State University, and the University of Delaware. Actual performance varies with variety, soil conditions, and local recommendations.
Soil Test Results:
Once you receive your soil test results, you’ll have the necessary information to evaluate soil quality. Identifying the soil pH, nutrient levels, organic matter, and texture will allow you to make informed decisions on what to do next.
CEC measures how well soil holds and exchanges nutrients that plants need. Sandy soils generally have lower CEC, while clay-rich soils generally have higher CEC. Soils with a CEC below 6 may require closer attention to nutrient retention and deficiencies, particularly potassium. CEC values of 15–20 generally indicate a greater capacity to hold nutrients, although interpretation depends on soil type and other soil properties.
Nutrient Levels:
For most plants, the soil test level needs a minimum of 40 lbs of Phosphorus (around 20 ppm) and 250 lb of Potassium (around 125 ppm). Nitrogen is harder to monitor and is based off of yield goals. Grasses species may require 100-200 lbs of actual Nitrogen per acre. A legume paired with its proper beneficial bacteria (inoculant) does not need extra Nitrogen, but starter N of 20 lbs is fine. In general, the soil test lab will let you know if your levels of Ca, Mg, Mn, Su, Bo are low, medium or high. You should consider adding amendments for these elements if they are on the borderline between medium and low.
Inoculant:
Many legume species have symbiotic relationships with specific bacteria to pull atmospheric Nitrogen into the soil. Strains of these bacteria, inoculants, provide beneficial bacteria that help compatible legume plants capture nitrogen from the atmosphere through biological nitrogen fixation. There are no inoculants for grass species. Our clovers are treated with inoculants on the seed coatings. However, due to short shelf stability, we sell soybean, cowpea and other legume inoculants separately.
Making Soil Amendments:
Once you receive your soil test results, use the laboratory’s recommendations to determine which amendments your soil needs and at what rates. Products marketed as quick fixes for raising soil pH may not provide the lasting correction needed.
Agricultural lime is commonly used to raise acidic soil pH. The amount needed depends on your current pH, soil characteristics, and the laboratory’s lime recommendation. If your soil test shows a pH below 5.5, pay particular attention to the recommended lime application.
Gypsum supplies calcium and sulfur and may help improve certain sodic or structurally restricted soils, but it does not replace lime when the goal is to raise soil pH. Choose amendments based on your soil test and the specific problem you are trying to correct.
Using A Soil Testing Kit At-Home:
These kits only check for the four main chemical factors influencing plant growth: nitrogen, potassium, phosphorus, and pH. To use a soil kit at home, follow the directions in the box or follow these steps:
1. Collect soil samples from different parts of your yard or garden and combine them in a single large container.
2. Spread the soil sample on a sheet of newsprint and let it dry for 12 hours.
3. Mix 1 cup (150 g) of soil with 5 cups (1,200 mL) of distilled water (products may vary on water volume).
4. Fill both chambers of the test containers included with your testing kit. Many testing kits come with a small dropper tool to help you measure the water accurately.
Traditional Fertility Management and Regenerative Practices Work Together:
Regenerative practices can help recycle and retain nutrients, but they cannot replace the need to correct low soil fertility. Cover crops and reduced tillage can help keep nutrients cycling in the topsoil, improve soil structure, and build organic matter over time. However, they cannot create the mineral nutrients that are missing from your soil.
If soil pH is too low or essential nutrients are deficient, plants may struggle to grow enough biomass to deliver the benefits expected from regenerative practices. Start by correcting soil pH based on your soil test and supplying the nutrients your plants need.
Legumes can add nitrogen to the system through biological nitrogen fixation when the appropriate inoculants and growing conditions support effective nodulation. Other nutrients, such as phosphorus and potassium, must come from existing soil reserves, recycled organic material, or external inputs when supplies are inadequate.
Plant genetics matter, too. Productive plants can contribute more biomass and help support soil improvement when fertility and growing conditions allow them to perform.
With our Buffalo Food Plot System®, we encourage the use of manure, appropriate inoculants, and lime when soil tests indicate low pH. The goal is to correct existing limitations first, then use regenerative practices to help keep nutrients cycling and build healthier soil over time.
The Beans and Greens™ Method:
For an optimal soil health routine, use our Beans and Greens™ Method. This in-season crop rotation can help reduce weed seed pressure and problems with fungus, nematodes and other diseases.
Plant an Eagle Seed Forage Soybean – excellent biomass producer – in the summer, then broadcast a fall diversity product such as Smorgasbord® over the existing soybean plot in the fall. Plant the fall blend 45–60 days before your area’s average fall frost, ideally just ahead of a good rain to encourage establishment.
Watch and learn how soil testing can help your animals and save you money.

FAQ: FREQUENTLY ASKED SOIL QUESTIONS:
When Should I Test My Soil?
The best time to test soil for accurate results is during the fall, specifically between September and December.
Start with a soil test to determine your current pH and lime requirement. Applying the recommended amount of agricultural lime can help raise pH and improve growing conditions for plants that struggle in acidic soil.
Regenerative practices can help recycle nutrients, improve soil structure, and build organic matter over time. However, they cannot replace correcting nutrient deficiencies or unsuitable soil pH when those limitations restrict plant growth.
Poor growth can result from unsuitable soil pH, nutrient deficiencies, compaction, drainage problems, or other growing conditions. A soil test can help identify nutrient and pH issues before you spend more on fertilizer.
It is recommended to test your soil once every three years. If you have a new plot and are working to move the pH significantly, it helps to test twice a year.